This is the first of four posts
that explores Tabular data analysis model in Microsoft SQL Server 2016. Four
posts are structured into a step by step guide without going into details (yet
explains when it’s necessary), so that anyone could start modeling start modeling
business intelligence solutions. Complete solution is available in GitHub.
This post will cover the steps
required to create a new project and load data into the project.
Prerequisites,
- SQL Server Analysis Services (SSAS) 2016 configured to use tabular model.
- SQL Server Data Tools (SSDT).
- Adventure Works DW 2014 sample database.
- Microsoft Excel.
Assuming all prerequisites are satisfied, let’s start work
by opening SSDT.
1. Create a new project in SSDT.
This can be done by navigating through File -> New -> New Project in menu. In New Project window navigate through Installed -> Templates -> Business Intelligence -> Analysis Services and select Analysis Services Tabular Project. In the same window, mention a Name, Location and Solution Name.

2. Select a SSAS instance to author the project.
Tabular model
designer window will appear after clicking Ok button in New Project window. Select
“Workspace server” to use an
existing SSAS instance and specify the server name. Also, make sure that compatibility level is set to SQL Server 2016 RTM (if this version is
not available, most probably the SSDT version is not the latest).

3. Connecting to a data source to import data.
We could connect
to a data source once the project is created. This can be done by navigating
through Model -> Import From Data Source in menu bar. In
Connect to a Data Source window
select Microsoft SQL Server
available under Relational Databases and click Next.

4. Specify the database and credentials to connect.
In Connect to
Microsoft SQL Server Database window, specify a connection name to be used and
the SQL Server instance name. Select the appropriate logon option and select AdventureWorksDW2014 from Database Name
dropdown. Once this is complete, click Next.

5. Specify the impersonation information.
This
impersonation information will be used by SSAS when it is connecting with data
source to import and process data. Once this is complete, click Next.

6. Select Tables and Views.
Use this window
to select necessary tables and views from the data warehouse. In this post we
will be using DimCustomer, DimDate, DimGeography, DimProduct,
DimProductCategory, DimProductSubCategory, and FactInternetSales. Change the
Friendly name of each selection as shown in below image.

Select the
entire row of a Table/View and click on Preview
& Filter button to remove unnecessary fields. Once we click on Preview & Filter button Preview Selected Table window will
popup. Uncheck the unwanted columns as mention in below table.

Table
|
Columns to remove
|
Customer
|
SpanishEducation
|
FrenchEducation
|
|
SpanishOccupation
|
|
FrenchOccupation
|
|
Date
|
DateKey
|
SpanishDayNameOfWeek
|
|
FrenchDayNameOfWeek
|
|
SpanishMonthName
|
|
FrenchMonthName
|
|
Geography
|
SpanishCountryRegionName
|
FrenchCountryRegionName
|
|
IpAddressLocator
|
|
Product
|
SpanishProductName
|
FrenchProductName
|
|
FrenchDescription
|
|
ChineseDescription
|
|
ArabicDescription
|
|
HebrewDescription
|
|
ThaiDescription
|
|
GernamDescription
|
|
JapaneseDescription
|
|
TurkishDescription
|
|
Product Category
|
SpanishProductCategoryName
|
FrenchProductCategoryName
|
|
Product Subcategory
|
SpanishProductSubcategoryName
|
FrenchProductSubcategoryName
|
|
Internet Sales
|
OrderDateKey
|
DueDateKey
|
|
ShipDateKey
|
Once this is
done, selected columns can be verified by click on Applied Filters link in Filter
Details columns.

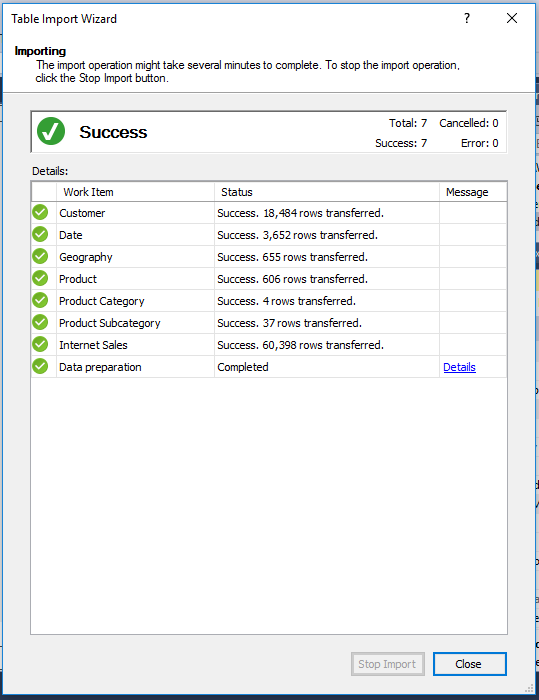
7. Import Tables.
Once table
selection is done, click on Finish
and it will start importing tables in to the tabular project. Upon successfully
import tables, click on close button to close the Table Import Wizard.
At this point,
imported data will be available in Model.bim
file and tables and relationships will be visible in Tabular Model Explorer.

In this post we discussed the
steps required to create a tabular project in SSDT and import data into it.
Next post will be focusing on working with tables and columns to form a tabular
model.
No comments:
Post a Comment